Flowers & Garden

12/31/2005

More Types Of Shrub To Use In Your Garden

By: Paul Curran

Buddleia, the butterfly bush, is 16 feet or more if not killed back by winter, and gets its name from the fact that in the summer, butterflies are always seen around it. The buddleia takes many forms: as a small - leaved shrub with small purple flowers; as fascinating, a cattleya-pink bush; as flaming violet, a brilliant purple, and as white profusion, a dwarf variety with pure white flowers. Also the Empire blue shrub, the dubonnet, the red glory and white cloud.

Flowering quince (Cydonia) has roselike flowers and a scarlet bloom in spring. Japanese quince grows to 6 feet; has orange-scarlet flowers.

Deutzia is an easily grown shrub, pleasing for the many small flowers in spring. Types include the 2- to 3-foot pink deutzia, with its delicate flowers; the pride of Rochester, with large double white flowers, and Deutzia Lemoinei, which has large, pure white flowers.

Other shrubs are the dwarf buckeye, which blossoms in July with 12-inch spikes; the chokeberry bush, liked for its decorative fruit; broom, which grows in sandy places and blooms in June and July, and witch hazel, a shrub that grows to 20 feet and has spidery yellow flowers.

Forsythia is a welcome shrub because it needs little care; with its drooping sprays of yellow flowers, it is useful for softening the lines of walls.

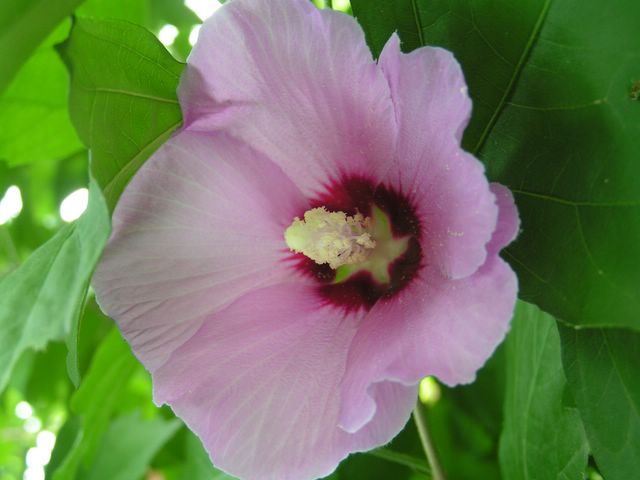
Hibiscus blooms in August, a rarity, with flowers that are large and purple, or rose-pink or white. It grows to 12 feet if unpruned.
hardy hibiscus

Beautiful hibiscus. Martinsburg, WV, USA captured July, 17th. 2005

Hydrangea, another shrub with large blossoms blooming in July and August, is a showy bush, with big blue globe-shaped clusters.

Honeysuckle bushes are useful for mass planting. Some varieties are especially enjoyable because they blossom in February and March. Several spirea varieties are found to be useful as screen plantings, particularly because of their dense growth and abundant flowering. Anthony Waterer spirea is a 2-foot bush with white or rose-pink clusters.

Bridal wreath has profuse white clusters in May. Spirea Thunbergii also has white flowers, and Spirea Vanhouttei, 8 feet high with dense white flowers, is used as a living fence.

Viburnum (the popular snowball) is 10 to 12 feet high at maturity and is used for high foundation, screening and hedges. It has white snowball-shaped flowers and foliage turns crimson in fall.

Weigela is popular, too, in many varieties, including the variegated weigela, a dwarf shrub with rose flowers and variegated silvery leaf. There is also Weigela rosea, with rosy trumpet-shaped flowers, and the new brilliant cardinal shrub.

About The Author...
Paul Curran is CEO of Cuzcom Internet Publishing Group and webmaster at Trees-and-Bushes.com, providing a range of quality plants, trees, bushes, shrubs, seeds and outdoor garden products. Website: www.trees-and-bushes.com

Technorati Profile


12/30/2005

More Landscaping Ideas

Making the Most of a Small Yard

A small yard does not have to be devoid of landscaping elements. There are plenty of things that can be done with a small yard to help it look nice, while not encroaching too much on usable space. The key is to plan well, and to choose plants and designs that are not too over powering. But, even though you may not be able to have large boulders or a sweeping flower garden, or a large pond, it is still possible to have a beautiful landscape that surrounds your home and helps you feel more comfortable in it. One of the things to remember when you have a small space is that you can build up rather than building out. You can do this by building raised beds for ... read more


Landscaping Ideas for Energy Efficiency

When you carefully position your trees, you can save money in both summer and winter. Large deciduous trees are great additions to any home for this purpose. These trees have large leaves and create shade during the summer. They block the sun, and this reduces how much money is needed to cool the home. Vines growing on the house and shrubs near the home (protecting basement windows) only help further. Now, here is the great thing about deciduous trees: they lose their leaves in the fall. This means that as the leaves fall of during autumn, they let more sunlight in. This means that natural light and even some warmth from the sun will filter into your house during the winter, lowering heating costs. And the best part ... read more


Tips for Planning Your Landscape

Another tool that can be very helpful as you plan your landscape is the use of landscape design software. Much of this software can be used to figure out which plants may look nice in your yard, and which plants would go with your house. Some programs even allow you to scan in an image of your own house in order to better get an idea of the possibilities. Most programs cost less than $70, and can even be used as references to determine which plants are best suited to survive in your climate.

With careful planning, and the use of a few tips, it is possible for you to plan out your landscape in such a way that you use your available space and your money much more efficiently. Read the whole article about planning your landscape...


12/29/2005

Start a garden journal in January, and you'll garden better for years

By Mary Robson

When and how gardeners honor the New Year depends on personal tendencies — for some of us, the equinoxes of March and September seem more "new" than Jan. 1.

But by social habit and conditioning, we toss our old calendars and start afresh when the year's numerals turn over. Does this mean we revive our garden journaling? Perhaps someone gave you a crisp, clean garden notebook, or a new batch of colored pencils ... or a digital camera. How can we efficiently gather gardening information with a new year and new tools?

If we gardened briefly — an intense spell in summer, then an end — garden journals would be no help at all. A quick gardening experience resembles a fad, like taking up crossword puzzles or gin rummy and then tiring of the adventure. Garden records exist to carry us across the flow of time, considering change and growth over years and even decades.

What's useful to keep?

Weather records. If I falter on other elements, I'm faithful about weather, especially extreme events. Weather gives us clues about plant behavior; the below-freezing week this month might reduce shrub buds and flowers when spring comes. Looking back, you can sleuth out the cause.

These quick observations aren't intended to add up to climate conclusions, but rather to link plant growth or problems to specific hot, cold, damp or dry days. (Benjamin Franklin famously wrote, "Some of us are weatherwise, some are otherwise!")

The plant morgue. I also record plants that expire. That's how I discovered that my newly planted pines on slopes weren't receiving enough water. One of them turned into a crispy critter practically overnight last July.

Garden maps. Freehand illustrations of what went where, and when. These can get pretty impressionistic, but they are more help than my muddle of plant tags in a drawer.

I like to indicate location for plants that emerge late. This recollection keeps me from planting on top of an Oriental lily or elegant hosta. They stay underground longer and appear to be creating new planting space. But alas, forking up half an expensive lily does not improve the gardening day.

When did the plant flower or fruit? I use a simple grid calendar to indicate "sarcococca blooming" or "harvested first Stupice tomato." If you do record events for more than one year, patterns will begin to fascinate. My snowdrops bloomed for Jan. 1, 2005, but now show bare nubs only, with no bloom for this New Year's Day. Cold spells retard bulbs. But the opposite is that a cool spring prolongs our daffodil and tulip show.

Bird visitors. My birding log overlaps with the garden journal. Thanksgiving Day 2005 found one Anna's hummingbird working over the rosemary flowers. I refreshed the feeder, but that bird has flown.

Specific activities. When did I mulch the lower terrace last? When did I lime the vegetable area? Since I have trouble remembering my only son's cellphone number, I know that writing it all down will give me information rather than vague ponderings.

No doubt you'll find your own personal necessities; some gardeners enjoy keeping purchase and cost records. Not me, boy oh boy. Sketches or photos add to the fun and keep our memories green. Two years of garden records will help; five years fills with treasures.

Garden expert Mary Robson is a retired area horticulture agent for Washington State University/King County Cooperative Extension. Her e-mail is marysophia@olympus.net.


12/27/2005

Fine Gardening Secrets Revealed

by Sally Summers

I hope you don't think I'm a bad person for admitting this to you. I was feeling a little bit jealous of my sister. Let me explain...

Every year, I visit my sister Joan in Houston -- and every year, her garden just keeps getting even more beautiful. On my last visit, she had a dazzling display of fabulous cutting flowers that absolutely took my breath away.

When she saw how impressed I was -- and how inquisitive I was about how she had created such a magnificent garden -- Joan finally let me in on her secret. It's a secret that just a small number of avid gardeners had kept to themselves for years.

But the secret isn't a secret anymore.

It's Fine Gardening magazine!

Fine Gardening is the magazine dedicated to gardening enthusiasts like you and me who want to surround ourselves with beauty, but need some guidance to achieve our dream gardens! With the inspiration and information found only in Fine Gardening, your garden will thrive like never before with colorful, abundant spreads of your favorite flowers!

I want to share the secret and also tell you about Fine Gardening because it's the perfect companion for every gardener -- no matter where you live, no matter if your available gardening space is a window box or an acre of fertile ground! Here's why:

The expert advice and techniques you get exclusively in Fine Gardening are brought to you by botanists, entomologists, nursery specialists, commercial growers, curators, landscape architects and groundskeepers, so you can be assured that you're getting accurate, tested, reliable information that you can use to cultivate everything from the simple to the spectacular.

As you can see, Fine Gardening knows what's important to gardeners like you and me!

With well wishes for your own fabulous flowers.


About the Author
Sally Summers is Editorial Director at www.BlueDolphin-Magazines.com and www.Magazine-Supermarket.com. You can read her weekly blog at http://sallysummers.blogspot.com where she talks about today's most popular magazines and how they can enrich your daily life.


12/24/2005

December Garden Calendar

  • Spread wood ashes evenly on vegetable garden. Use no more than 1.5 pounds per 100 square feet a year. Do not use if the soil pH is higher than 7.0 or if potassium levels are excessive.


  • Use dormant sprays of lime sulfur or copper fungicide on fruit trees and roses for general disease control.


  • Protect new landscape plants from wind with staking, guy wires, windbreaks and site selection.


  • Make sure that landscape plants in protected sites receive water regularly during the winter.


  • Monitor landscape plants for problems. Do not treat unless a problem is identified.


  • Take care of yard sanitation: Rake leaves, cut and remove withered stalks of perennial flowers, mulch flowerbeds, hoe or pull winter weeds.


  • Check for rodent damage around base of trees and large shrubs.


  • Spray peach trees with lime sulfur or approved fungicides to protect against peach leaf curl. Choose resistant varieties if possible.


  • There’s still time to plant spring-flowering bulbs such as tulips, daffodils, hyacinths and crocuses. Don’t delay. This is a good time of year to plant trees and landscape shrubs.


  • Avoid mounding mulching materials around the base of trees and shrubs. They might provide cover for rodents.


  • During heavy rains, watch for drainage problems in the yard. Tiling, ditching and French drains are possible solutions.


  • Protect poinsettias from cold, place in sunlight, don’t let leaves touch cold windows; fertilize with houseplant fertilizers to maintain leaf color.


  • Monitor houseplants for adequate water, fertilizer and humidity. Water and fertilizer requirements generally are less in winter.


  • Check stored flower bulbs, fresh vegetables and fruits for rot and fungus problems. Discard any showing signs of rot.


  • Make holiday decorations from trees and shrubs in the yard.


  • Monitor spruce trees for spruce aphids. Treat if present in large numbers. Read and follow label directions.


  • Tie limbs of columnar evergreens to prevent snow or ice breakage.


  • If the lawn is frozen, stay off it.


  • Use paper tree wraps on lower trunks of newly planted fruit and nut trees to avoid sun damage.


  • Turn the compost pile.


  • 12/23/2005

    Humus Happens - What the Heck is Humus Anyway?

    If you do not know what Humus is, join the club. No, it's not the tasty Mediterranean treat spread on pita bread. It is a term used to describe a process that is vital to life on earth. You may be wondering, why then was it not a major item on your high school biology exam? Well, that could be because Humus is such a tough word to define. It is a process that has been playing hide and seek with scientists, gardeners and biologists for centuries.

    Humus is to plants what drawing breath is to us. We take it for granted and no one really talks about it, but if it stops, we stop. And that would mean for good. The difference is that we can explain and understand respiration. Humus is not so easy to clear up. There are parts of the process that have been revealed but eventually, we have to admit that Humus is still something we just don't fully get.

    A great example of this is the plentiful descriptions of Humus that can be found. Some are lengthy explanations that seem to go in circles. While others are relatively clear, but really hard for us that don't hold any Biology degrees, to understand. So here is a little bit about Humus. It will not get you into graduate school, but it will help you understand why your garden is working or why it isn't.

    Humus is one of those scientific terms that often are defined by using itself. That is because it is easier to through a term out there then trying to dissect the scientific meaning behind it. Humus is also used as a label for an intense process that is difficult to explain.

    With all that said, there are still a couple of things that gardeners and just ordinary people might want to know about Humus. It is, after all essential to life on earth, making this tricky term very important. Let's begin with a small piece of the pie. Humus is the result of decomposed organic materials in soil. It is a mixture of animal, plant and other organic materials from manure and decomposition. The process that leads to Humus production is called humification. Humification naturally takes place in soil or when compost is made. It is essential in increasing the fertility of soil. Humus holds moisture in the soil and makes plant growth possible.

    Humification is an intense process that combines water soil, sun and decomposing materials of living things to provide nutrients for plants. How it is extracted from soil is still a mystery. People have been trying to pinpoint a clear concise definition of Humus since the days of the Romans. In the late eighteenth century J.G Wallenis narrowed Humus down to the decomposition of organic materials. He was headed in the right direction but it wasn't until 1840 that it was discovered that plants can not get minerals directly from the soil.

    Plants can only get nutrients from the soil in an inorganic state. Plant food is transformed first into mineral salts. Theses mineral salts are the result of the humification of decomposing matter which is the most efficient environment for Aerobic microorganism. The amount of free oxygen present in soil is a major contributor in managing good or bad conditions under which Humus is created. Soil temperature and moisture combine with the decomposing residue and make Humus. If there is too much oxygen and organic matter decomposing swiftly Humus won't occur. This is common in tropical areas. Another determiner is soil temperature. If coil temperature rises, microbial activity increases. In very aerated soil Humus does not build up.

    There are different types of Humus. There is peat Humus and it can also be formed in water or soil. The better the Humus, the better your garden will be. You will have healthier plants due to the soil balance that Humus maintains.

    Of course, as a gardener it would be nice to have a clear definition of Humus. But let's face it, we can't explain everything. Just be glad that it is here to help you in you gardening endeavors. Humus Happens! And that is the most important thing for you to know about it.


    Cute Ideas That Can Save You Money on Your Planting

    There are many interesting ideas that can help you save money on your planting and landscaping. Most of these ideas involve a little creativity, but you end up with an attractive and distinctive yard. And some of the ideas look nice and can save you money in other areas of your life, like food. At any rate, there are quite a few easy ways to stretch your dollar and still make plants an attractive part of the landscape.

    Use vegetables. Plant vegetable seeds in your flower garden. Seeds cost much less than plants, especially many flowering plants that have already started growing. Choose attractive varieties that mix well with flowers and are attractive in their own right. Peppers look nice among flowers, with their attractive leaves and colorful issue as they ripen. Pumpkins and bushy-plant squashes actually look very nice planted in the same way one would plant an island of flowers. Squashes and pumpkin’s flower so they are pretty when they bloom, and their leaves grow big and beautiful. Tomatoes make great accent plants on the edges of flower gardens, and peas can be set up to grow on small edge fences. Their curly vines are appealing, and they are among the least expensive of vegetable. Not only can vegetables save you money in enhancing the look of your landscape, but they also save you money when it comes to eat.

    Herbs for ground cover. Instead of spending money to buy plants designed for ground cover, invest in an herb garden. Buy seeds for the herbs you commonly use in your cooking: parsley, rosemary, thyme, oregano, and sage are all very attractive plants. They grow close to the ground, and can grow thickly, creating ideal ground cover. Chives and green onions can be planted behind for an even more ornamental look. Herbs also grow fast, and you can use them in your cooking, saving you money at the grocery store. You can still have your flowers throughout your garden, as these herbs go with any color scheme. Additionally, they will add a pleasing aroma to your home environs, making it inviting in smell as well as in looks.

    Container gardens. Container gardens are among the cutest and more inexpensive landscaping ideas. Rather than trying to treat your soil and dealing with the constant hassles of upkeep, make a container garden. Your garden can hold a variety of plants, although annuals are among the best for this type of garden, as you can easily replace them as they dies out. It is possible to use perennials in a container garden, however, as long as you use a larger container so that they have room to create their extra bulbs. Buy potting soil on sale (if you buy at the end of the season, you can get it for sometimes as little as one or two dollars a bag), and then you can plant seeds in the soil. By the time winter is over, you should have flowers fit to be set outside.

    You can use almost anything for containers. Old washtubs and tin cans make quaint containers. Clay pots are a little more elegant and can also be very decorative and attractive. It is even possible to use milk cartons (with the tops cut off) as containers. Whatever strikes your fancy and is deep enough to let the roots grow (which really is not too terribly deep) can be used in container gardening. Large urns and hanging baskets can also add to the look of your home. Much of the time you can get these items on clearance at the end of the season for just a few dollars.

    After arranging your plants in their containers, you can then set your urns, pots, and old washtubs wherever you wish to in your yard. Hanging baskets need not hang only above your porch. If you have large enough trees that can support them, you can hang them from the branches. When planting your baskets, use starts or seeds. They cost less than more mature plants. It is even possible to start a herb garden and you can even grow most vegetables in containers.

    With a little creativity, it is possible for you to turn a commonplace landscape into something really attractive without a lot of back breaking work and without having to spend a great deal of money to make improvements to the soil.

    © 2005, Flowers&Garden.com

    This article is provided courtesy of Flowers&Garden.com - You may freely reprint this article on your website or in your newsletter provided this courtesy notice and the author name and URL remain intact.


    12/22/2005

    Tree and Shrub Care Programs

    In many communities there are companies that offer tree and shrub care programs. These programs are the health care plans of the plant world. They are designed to help you monitor and care for your plants, as well as treat problems that come up. It is even possible for you to design your own tree and shrub care program that can aid you as you take care of the plants yourself, with minimal help from the care specialist.

    But one thing is certain: in order to keep your landscape looking healthy and attractive, you do need to take an active interest in some sort of care regimen for your trees and shrubs.

    There are many benefits associated with having a care program for trees and shrubs. Benefits include catching infestations early and identifying diseases while they are treatable and before they do too much damage. A caterpillar infestation can cause defoliation, and if you move quickly to avoid this, your trees will look much better for longer. Additionally, if plants have good care, they are more resistant to disease and will flourish, giving your landscape a more attractive look. A proper program of care can prevent these problems and save you money on down the road. The old saying "An ounce of prevention is worth a pound of cure" is certainly true, especially as it relates to plants.

    Other problems that a tree and shrub care program can help with are less detrimental to the health of the plants and more practical in nature. Proper monitoring can unsure that weak branches are removed before they fall on and damage your house. Additionally, proper care and pruning of branches ensures abundant flowering and a thicker, fuller look in evergreens. While better flowering and fuller plants may not directly affect the health of the plant or your wallet, they do add substantially to the attractiveness of a landscape and can contribute to the better enjoyment of your home.

    Most tree and shrub care programs are developed and administered by specialized companies that provide care. They can also be arranged through an arborist or a master gardener. These programs do cost money, however. There are comprehensive programs that cover all costs related to monitoring your landscape plants and treating any problems or providing specific care. There are also programs that provide monitoring services and then charge treatments separately. The idea is to use a program that fits into your budget, and then reap the benefits of a landscape that is well cared for.

    Another approach to the tree and shrub care program is developing and following one yourself. It may cost a little money up front, as you will have to consult with a master gardener or an arborist, but in the long run it is worth it if you take good care of your trees. In some localities, an extension office may have a horticulturist on hand to answer your questions at no charge. The key is to figure out a care program that you can carry out yourself, or that you can carry out mostly on your own, with back up help from professionals when needed.

    Developing your own plan can be very rewarding. It helps you get closer to your landscape, and it can also help you spot problems quickly. You should have a regular schedule for inspection of trees and shrubs, as well as other plants, and a regular schedule of care and maintenance. To learn how to properly prune trees and shrubs, keep an eye out for community classes. You can even pay for a session with a professional. Paying for a two or three hour lesson in pruning can save you hundreds of dollars in having to pay a yard service to do the work. Make sure you know the best times to prune, and do your pruning on a schedule as well as the rest of the landscape maintenance.

    No matter whether you pay for a professional tree and shrub care program, or whether you carry out such a regimen yourself, it is important to have a plan for the proper care of the plants on your landscape. This way you will find that you have a more attractive landscape and save money in trying to fix large problems that arise through neglect.

    © 2005, Flowers&Garden.com

    This article is provided courtesy of Flowers&Garden.com - You may freely reprint this article on your website or in your newsletter provided this courtesy notice and the author name and URL remain intact.


    12/18/2005

    5 Ways to Take Care of your Roses in Winter Months

    Ways of winter - Five Ways to Take Care of your Roses in Winter Months

    If you are a Rosarian, no matter where you live, you will want to winterize your roses. There is a school of thought that says winterizing is not necessary for some roses in some colder climates. But, while some climates permit minimal winter preparation and some rose varieties require little work for the winter, all roses need some type of treatment for any type of winter.

    Roses are delicate plants that not only benefit from, but need, special attention. Of course, the return that roses give growers is ample to the efforts put into their care. Worldwide they are one of the most beloved plants and have come to be recognized as a sign of beauty and love. So why risk losing your precious roses because you did not winterize them correctly? A little time and effort can greatly improve the survival rate of your roses. Preserve your roses. Five easy steps can help your roses through the toughest of winters.

    Don’t let the winter month’s sweep in and steal them away from you. Roses are resilient little troopers if you give them a jumpstart. If you set your roses up properly for the long, dark, snowy months ahead, they will be waiting for you in the spring. In climates that produce temperatures that remain below 20-degrees F (7-degrees C) for long stretches without snow cover apply cover to your roses. If winters in your climate bring temperatures below 10 degrees F (12 degrees C) protective covering is necessary. In climates where winter is cool but low temperatures are rare, leave roses out in the open.

    Just before September hits stop feeding and pruning your roses. This will stop the growth of delicate new blossoms that can not survive the winter from forming. After the first frost give your roses a good watering session. This will give the roses a good start as they head into a long stretch of independent care. Take the time to give your rose bed a thorough cleaning. Get rid of any diseases and insects. Remove fallen petals and leaves in the rose bed. Don’t attempt to reuse the rose bed debris in compost. Those unwanted pests may be lying in wait. Get rid of any old leaves so no insects hitch a ride on your roses into winter.

    The time to begin preparing your roses for winter depends largely on your climate. In some climates you will want to begin protection after the first frost. In others you don’t need to bundle your roses up until after the second frost. Apply protection as late as possible without compromising your roses and remove it as early as you can. Late November is a good time to get the protection on, but if your climate affords it, wait until Christmas.

    Hybrid teas are the most popular roses grown in America. They are partially derived from plants that grow in moderate regions where winters are extremely mild. That means they are especially sensitive to the cold weather. Pile a six to eight inch pile of dirt along the base of the bush before the ground completely freezes.

    While there are a few Rosarians that support protecting more than the bud union, most believe that covering the buds will suffice, unless you are growing climbing roses. Then you want to cover as much as you can. Wrap a heat conducting material around the bud union of the rose.

    If you are dealing with climbing roses, these same basic steps will help you to winterize. Gently remove the canes from the arbors and bind them to one another. Remove the foliage and bend the canes to the ground before placing a wood and wire frame above the plant. Then the bush, without any major pruning, is encased entirely in a thermal blanket.

    It is good to get your roses back into the open as soon as possible. Late April is a great time to set your roses free. New growth will have been stifled long enough to prevent damage from late season frosts. What destroys roses in the winter is debatable. Some believe it is the dehydrated soil. Other think it’s the first strong frost, winterizing itself is also up for debate. This is a case of better safe than sorry.


    Down with Deadheads - What's it and how to do it?

    There is nothing like a rose. The sweet smelling scent they produce might just be enough to get your nose stung by a pollinating bee, or another type of insect when sticking your nose into one! It doesn't matter if it's a wild garden rose, old rose, or a modern breed; they are beautiful to look at, and a delight to your smelling senses. If you're wondering now that you've planted your new rosebush, how do you get more roses to bloom for a couple of years, then take this rose advice to heart – by deadheading them.

    What is deadheading a rosebush? The simple answer is that by deadheading you're cutting off the older dried up roses that are dead. Deadheading encourages new flower growth for its next growing season. Using the deadhead method is typical for the new modern breed of roses that are genetically engineered. Older roses are usually pruned, which is a different type of care for roses, and wild roses are left most of the time for a look of wildness in form. Also, for the older type rose varieties at the end of their season they will form hips or seeds that will need to be left, this will help them grow again in the next years season. Always be sure on the type of rose plant, whether you need to let hip, prune, or deadhead. It makes all the difference.

    By carefully deadheading your rose bush next year you'll have great looking roses because you've helped the rose bush save some energy. The formation of hips on them requires the bush to spend a lot energy that it shouldn't have to. Most bushes of any type are finicky, and require maintenance. So expect to care for your roses by cutting, or deadheading, for a couple of years.

    How do you deadhead?

    Read these 2 tips on how to deadhead them for the first 2 seasons of growth, but remember to always consider your zone areas, and if in question consult a good book, talk to your local florist, or ask around for some local help from a qualified rose grower. It might be necessary to do all three for the sake of your rosebush.

    Cut at a 45 degree angel with a sharp pruning tool, back 3 – 5 leaf branches downward from top of bloom. This cut will be off the main branch.

    Cut the leaf set of stem that is facing the outward direction. This will be the high side of a cut, on the side that the leaf set is on.

    The optimum leaf set removal for the first years trimming is a 3 bunch, but 5 are ok too. The goal is to try to remove as little as possible for the first year's season. Also, it's vitally important that you start looking to deadhead your rose bushes at least 3 – 4 weeks before it starts to approach the end of its growing season.

    No matter what zone you live in because it's now the end of the growing season for your rosebush, take some time to get it ready for the winter. It's vital that you do. After all why go to all of the time and expense of buying, planting, watering and caring for your plant from the beginning, and then deadheading it, and letting it languish in the winter and die? Remember bushes require loving care and attention.

    Here are a few more tips for caring for your roses.

    Clean away debris such as paper, old sticks, or any other garbage that's not supposed to be under the plant.

    Use a good spray on it to kill any nasty bugs or bacteria that could kill your rose bush when it's lying dormant in the winter.

    Apply a good type of fertilizer to the base of it, but make sure to reduce the Nitrogen in whatever fertilizer you use. It will burn the plant and cause other types of bacteria. Leaves from your yard will work nicely as mulch for your bush. Check leaf types that are okay to use.

    Cover with a heavy burlap sack to protect the top of it.

    It does sound like a lot of work to have a breath taking rosebush, but next year when you walk out and uncover your roses, you'll find that the effort you put into it will have been well worth it. You’ll see the wonderful site of a new leaf branch growing gracefully out of the old from last year. Have fun being a dead header to your new rosebush.


    12/05/2005

    Questions to Ask Yourself When Designing a Landscape

    There are quite a few things to take into consideration as you design your landscape. While creating your own design for your yard can be a very rewarding experience, it is important to carefully consider your plans before putting them in action. Additionally, asking yourself a few questions and thoughtfully addressing the answers can help you make improvements to your design and can help you better plan to use the space around your home. When you think about what you are doing and make a plan, you are much more likely to enjoy a successful landscape experience as you design an improved environment to surround your house.

    The first question you need to ask yourself has to do with budget. Can you afford to make all of your planned improvements at once? Or do you need to create a plan of phases that can help you reach your goals one at a time. You should know how much money you can spend on each phase of your project, and you might even consider what you will do if you come in under budget. Will you buy a couple more plants? Add a more decorative retaining wall? But you need to set a total amount that can be used for your landscape and then stick to the budget.

    A budget rule of thumb is as follows: costs of landscaping should be about 10 percent of the value of the home. This cost includes things like irrigation, fencing, decks, patios, ponds, and any other element you wish to include in the yard. There is no need to pay this all at once, however; it is much more reasonable to improve over the years with ready money in order to leave yourself less encumbered by debt.

    Another thing that you need to ask yourself is what the space will be used for. You need to think about what activities will be taking place, and how you would like to use the space. Figure out how you and your family move through the landscape. This will help you determine where you walk most often, and allow you to accommodate for that. You do not want to create a design that suddenly makes it more difficult to get to the mailbox or to get groceries from the car. Consider where you would like children to play, and think about how you will incorporate trees, fences, flower beds, and other elements into the space without damaging its utility.

    How does sunlight cover your property? This is a very important question, as it will help you determine where to plant certain vegetation. You need to know whether certain sites receive full light (at least six hours a day of sunlight), partial shade (four to six hours — this is also called partial light) or full shade (less than four hours). Figure out which plants will go where according to how much light they will need.

    Ask yourself what kinds of plants grow well in your area. You might really like how some succulents look, but if you live in a very wet area, they might drown in all the extra water. Make sure that you know what plants are native to your area, and what plants are native to areas with a similar climate. Along with this, you should be sure to find out your soil composition. It is very important that you know what plants will survive in the soil in which you plant them, or whether you will need to improve your soil with amendments such as crushed shells or organic compost.

    Finally, ask yourself what you think would be attractive. You can do this by take a picture of your yard and then mentally adding plants. You can also sketch out what you think would work well, and decide whether it really does accomplish the look that you want. You also want to ensure that the new landscape design is convenient and doable, especially if you will be creating it yourself.

    By taking care to ask yourself a few simple questions and honestly answer them, you will find that your landscape design plan can be carried out more efficiently, with regard to effort, time, and cost.

    © 2005, Flowers&Garden.com

    This article is provided courtesy of Flowers&Garden.com - You may freely reprint this article on your website or in your newsletter provided this courtesy notice and the author name and URL remain intact.


    12/04/2005

    Hybrid Happenings – What is a Hybrid Tea Rose

    Hybrids, Teas, Floribundas, Grandifloras—the world of roses are so vast and confused that even the most experienced gardener may find himself or herself confused. So what exactly are hybrid tea roses? Hybrid tea roses are the result of crossing the Hybrid Perpetual (a European rose) with the Tea rose from China.

    Simply stated, hybrid tea roses are the roses you see in the florist’s window in the days following up to Valentine’s Day. Hybrid tea roses are the classic image of rose beauty. They have large blooms (typically 6 inches in diameter), and usually only produce one bloom per stem. The bloom unfolds elegantly, with large velvet petals that spiral out from the center in mesmerizing layers. Hybrid tea roses are a favorite of gardener’s who love to cut long-stemmed flowers to put on display. They are also a favorite of photographers who love to capture the explosion of petals and colors that hybrid tea roses offer. Because they are known to flower continuously, hybrid tea roses are often referred to as ever blooming or monthly roses.

    Hybrid tea roses became wildly popular in the middle of the nineteenth century, when they became “the” rose to have in the garden. The Victorian Era saw a flurry of experimentation with cross pollinization among plant breeders, eventually resulting in the culmination of hybridized tea roses. Victorian Era plant breeders sought to balance elegance and beauty with perpetual flowering, and they seemed to achieve this in the propagation of hybrid tea roses. The Tea rose, admired for its repeated blooms, was the perfect complement for the Hybrid Perpetual.

    The ‘La France’ is generally considered to be the first official hybrid tea rose, although breeders did not keep accurate records in those days. A Frenchman popularly referred to as Giullot, in 1867, discovered it. It is said that his discovery of the La France was an accident. He was attempting to produce a large bright yellow rose, but instead produced a rose with silvery-pink blooms that turned bright pink at the tip of the petals. The flower was fragrant and very large (nearly 5 inches in diameter) for its time. The large bloom and dramatic colors of the La France made it the star of its day.

    Hybrid Tea roses continued to grow in popularity. Their long ‘lollipop’ stems allowed for clear visibility of the bloom and easy cutting. With their vivid color designs and the elegance of their unfurling buds, they were perceived as much more dramatic than previous roses. Perhaps most importantly, hybrid tea roses produced larger and more frequent blooms.

    Today, hybrid tea roses are much more commonly grown for cut flowers. They are no longer as prominent in landscape settings as they were during the Victorian Era. However, if you’d like to add the classic beauty of the hybrid tea rose to your garden, here are a few tips on choosing the right hybrid tea rose for you.

    Do you want big blooms on long stems that you can arrange and put on display? Hybrid tea roses are probably for you. If you’re looking for roses to landscape your home, consider Grandifloras or climbing roses, instead.

    Do you want a rose that emits a strong fragrance? If this is the case, hybrid tea roses may not be for you. Hybrid tea roses usually only give off a faint scent.

    Do you want a relatively low-maintenance rose, or are you willing to water every day in during the hot summer months? In general, hybrid tea roses require a lot of water, especially during hot weather. If you’re not prepared to do a lot of watering, hybrid tea roses may not be your best choice. Also, hybrid tea roses do not enjoy the company of weeds, so be prepared to provide proper maintenance.

    Can you deal with thorns? Hybrid tea roses are notorious for their thorns. If you don’t think you’ll have the patience to deal with this thorny issue, you might want to reconsider hybrid tea roses. However, breeders have been able to produce several thornless varieties of hybrid tea roses. These thornless roses might be a little more expensive and difficult to find, but the trouble is most definitely offset by their beauty.

    © 2005, Flowers-and-Garden.com

    This article is provided courtesy of Flowers&Garden.com - You may freely reprint this article on your website or in your newsletter provided this courtesy notice and the author name and URL remain intact.


    A Thorny Subject - How to Properly Remove Rose Thorns

    You've probably heard the phrase: every rose has its thorn. Too many, thorns symbolize the danger that lurks behind the beauty of the roses, and all sorts of myths try to explain the presence of these dangerous little daggers on rose stems. Greek myth suggests that Cupid shot arrows into the roses accidentally after being stung by a bee and it was the sting from his arrow that caused the thorns to take root.

    Don't despair if these little daggers are a thorn in your side. With a little care and some patience, you can remove those pesky thorns for a nice smooth stem on your rose.

    Thorns do actually help the plant drink water, so it is important that you remove them properly and do not inflict excessive damage on the stem. You need to take your time and practice a proper dethorning technique – otherwise you and the rose will be injured in the process.

    Carelessly removing thorns will damage your roses in the long run. They will not last as long as they should and any peeled or torn skin will hinder the amount of water that makes its way up to the petals. Proper dethorning takes practice and patience.

    You can remove thorns right on the plant, or you can wait until the stem is cut and do it then. It is best to try and remove thorns on the cane when it is quite young and before the rose blooms if you know that the stem will be cut at some point in the future for display or for the creation of a bouquet. You can remove thorns by applying slight pressure to the sides to simply push them off the stem. You can use this same procedure with cut stems.

    Removing thorns by hand is a tedious task, and with some roses, the thorns grow so close together that it is almost impossible to push one off without stabbing yourself on another one. That's where a dethorning tool can come in handy.

    You can purchase a specialty product like a thorn stripper. This type of tool strips the stem of leaves and thorns. You can also fashion your own with some metal strapping from your local hardware store. If you do make your own, be sure to file the edges that touch the flower so the stem is not torn excessively in the dethorning process.

    To use a dethroning tool, you simply hold it just below the flower and close the jaws together around the stem. Be sure that you don’t use too much pressure when closing the jaws of the stripper because you could damage or even severe the stem. Lightly drag the dethorner down the stem. The thorns should pop right off. It may take a bit of practice to get the hand of a thorn stripper, but after a few tries you should have a good idea of how much pressure is needed to remove the thorns.

    You can also remove thorns with a knife. All you need to do is scrape the stem of the rose with a sharp floral or small pairing knife. If you are removing thorns from the cut stem, then you might consider only removing the thorns and leaves that lie below the water level.

    You want to think carefully about whether or not you need to remove all the thorns from your roses. It is important to remove rose thorns when the flowers will be in a hand held bouquet or worn on the lapel. When placing cut stems in a vase for display, you should remove the thorns that will be below the surface of the water, but you don't need to take off those that will be above water level. Removing thorns can shorten the life of your roses so be sure that you aren't over dethorning your blooms.

    An important time to do some dethorning, though, is when you are preparing plant litter for your compost pile. After pruning off any dead or decaying canes from your rose bush, you should consider removing the thorns before tossing the old stems into your compost pile. Removing the thorns will make it safer for you to work and exposing the stem in this way will also help sped up the decomposition process.

    © 2005, Flowers&Garden.com

    This article is provided courtesy of Flowers&Garden.com - You may freely reprint this article on your website or in your newsletter provided this courtesy notice and the author name and URL remain intact.


    12/03/2005

    Driveway Landscaping

    Landscaping driveways does not necessarily mean the driveway itself, although the design of your driveway can impact the look and feel of your landscape. Rather, many people neglect to landscape their driveways to look attractive. This includes adding landscaping elements to the sides of the driveway, as well as at the bottom and the top of the driveway.

    There are many softscape and hardscape elements that can be added to make the area surrounding the driveway more attractive. Your driveway landscape is the entrance to your property. If you ignore it, the driveway can look more like an ugly scar than a part of your landscape. If properly incorporated, however, it is possible to
    create a nice looking element in your landscape, tying it in to the rest of your design and looking as though it truly belongs. It is very worth your while to make an attempt at landscaping around your driveway.

    You need not spend a great deal of money to landscape your driveway, but if you carefully choose features and elements that are attractive and creative, you can have a fairly low-cost driveway landscape that is inviting to visitors as well as to those who live inside the house.

    Before landscaping the driveway, however, there are a few things to take into account. First of all, you need to make sure that what you are doing will not be so much wasted work. Take into account your neighborhood. If there are a great deal of children, a flower bed at the entrance, near the street, may not be a wise decision. It may be trampled careless children, or the flowers may be picked.

    While these actions do not usually the products malice, they can result in a ragged and disheveled looking driveway entrance. In such a neighborhood one might consider accenting the entrance with an attractive fence, rock wall, or even a small rock garden. Also determine the footpaths traveled by those who live in the house.

    Make sure that any elements you add to the sides or ends of the driveway are not interfering in established walkways. Some of the common hardscape options are walls and fences. These are projects that can add distinction and accent to your driveway area. A rock wall can be especially interesting if you use different colored rocks. It is also possible to plant grasses and small, hardy flowers in the cracks between the stones used to construct the wall. This can be decorative and it can add a more interesting aspect to your rock wall.

    Short, attractive fences, and even some of higher height, can also accent the driveway and give it a little more color and character. Small hanging baskets or lanterns can be used with either a fence or a wall to add more beauty.

    There are plenty of softscape options for dressing up the area around the driveway. The first thing you need to decide (and this goes for hardscape accents as well) is whether you plan to use the landscape elements to run the length of the driveway or to simply accent the entrance to the driveway. If you are working with a very
    small budget, simply accenting either side of the driveway, near the bottom, is a good idea. It will cost much less, but add a great deal to the look of your over all landscape. Some of the softscape ideas that work well either to follow the driveway up or simply to add character to the entrance, include beds of colorful annuals, groundcover along the drive to create a natural and interesting border with the lawn, ornamental trees, and shrubs.

    The shrubs can even be cut to be topiary and have interesting designs. A curved driveway is interesting of itself, and can be made even more so if a focal point is added to nestle in the curve. This focal point should be something of beauty. It can be as simple as a stately oak, or a specially designed flowerbed or rock garden. Or, instead of being something simple, the focal point can be something else entirely. Landscape bridges, wishing wells, garden arbors, and water gardens all make excellent focal points that can be exceptionally attractive.

    Looking for more landscaping ideas. Please visit our landscaping ideas article section.


    The Art to Preparing Proper Rose Cuttings

    The art of propagating roses through rose cuttings has been used since the Victorian Era, and was popular with the pioneers who journeyed across the United States looking for a new life. They brought along cuttings from their gardens, tucking them into mason jars and looking for new land to plant them in.

    bicolor rose varietiesUsing rose cuttings to propagate new plants is still one of the simplest and most fun garden projects that any gardener can undertake with relative ease. And what better way to start off a beautiful rose garden on the cheap? There is no right way for preparing rose cuttings. In fact, everyone seems to have their own special recipe propagating roses. Here a few suggestions to get you started in the ancient art of preparing and planting rose cuttings. You may want to experiment with different methods to find what works best in your garden.


    The Stick in the Ground Method

    This is the easiest and most basic way to get started in rose propagation. The first step in preparing rose cuttings for planting is to find a good stem. Most gardeners interested in rose propagation already have a plant in mind. Maybe you have access to a rose bush that you love, but which is not commercially available. In this case, look for a healthy green stem that measures about one foot in length. The best cuttings usually come from rose bushes that have recently bloomed, but whose buds have not yet swelled (indicating that active growth has not started). Also, it is best to remove a stem from a plant that has been recently watered, so it will still be relatively hydrated when you plant it.

    If you have the option, choose a stem with smaller, rather than larger, buds. Ideally, the stem you pick should have at least three buds. It should be completely disease free. Once you have found a suitable stem, use a pair of sharp pruning shears to cut it from the plant. Remove any remaining bloom parts and foliage.

    Once removed from the rose bush, prepare to trim the stem to a workable size. Make sure you are holding the stem so that the buds point up and outwards. Hold your pruning shears at a 45 degree angle, position the shears just above the top bud and make a clean cut. Now, position your shears just below the bottom bud of the stem and make a similarly angled cut.

    Once your stem has been trimmed, it is ready to plant. Select a location in your garden where the cutting will be protected from winter weather and interference from animals or foot traffic. Ideally, the spot you select will have relatively fertile soil, receives an adequate amount of sunlight, and have good drainage. Make a small hole with a trowel, and plant the root cutting. Push the root cutting about halfway down, and pat the soil around it to ensure it will not fall over easily. Keep the rose cuttings moist at all times. Note its proper name and location with a garden marker—you don’t want someone to come along and accidentally remove it!

    The Mason jar Method

    For this method, cut a stem from your favorite rose as described in the Stick in the Ground method. Remove any leaves from the stem, and plant it in the ground. Cover it with a mason jar. Water the soil around the jar periodically so the stem does not dry out. If you’re lucky, after approximately two months you should begin to see new leaf growth from your rose cutting.

    The Potting Method

    For this method, prepare small two-inch plastic garden pots for planting. Fill them with potting soil. One popular planting mix combines one part potting soil with one part perlite. This light medium helps encourage new root growth.

    Push the rose cutting into the planting mix, and place the pot in a sunny location. Water the rose cutting regularly. The potting method is favored by many root cutting enthusiasts because it allows you to place the cutting in a spot where you can keep a watchful eye on its progress. Also, if you’re rose cutting grows; it is easy to transplant it later on if it is already in a pot.